The benefits of using Dependency Injection/IoC are more or less obvious, for an "academic" argument search the internets. Anyway, I started coding using the "Manager classes with static methods" style seen in most of the XNA tutorials and pretty soon my code became "spaghetized" and I realized that I really missed having an IoC container. After a few searches it appeared that I would have to make one - I would have used springframework.net or Castle or Unity or whatever but all of them seem to be using Reflection.Emit which is not available on the Xbox360. Plus they just do way to much for what a game needs.
Code is not ready for public consumption just yet, but I'll clean it up and publish as soon as I can.
Anyway, it's called Radiality and it has all the features you would expect from an IoC container, life cycle management, singletons, prototypes, auto-wiring, late injection, look up by interface or name and a few more thing I forgot about.
Here is what it looks like in action.
Wednesday, October 1, 2008
Saturday, September 13, 2008
Blogging is hard
Phew, I just finished my first serious post and I must say, blogging is hard and I kept having "Barbie moments".
Blogger is not terribly "programmer friendly" - there is no plugin or whatever they call it to post source code - I eventually found out about various javascripts that would solve the problem, settled on syntaxhighlighter, almost gave up on using after seeing that it needs to be hosted somewhere and finally figured out that I can point directly to the Subversion repository.
Phew again. Now I get to post some source code - but it looks all wrong, the code lines are too long and they wrap and it looks pretty bad - and of course I can't get Visual Studio to do nice line wrapping (maybe ReSharper would help but I cannot afford it). I manually get to format my code to approximately 80 characters per line.
Almost there, but the Blogger WYSIWYGWSYGFYGFWSYG editor keeps messing up the paragraphs so I have to edit in the HTML view - retarded - but I get used to it.
And I still can't figure out how to attach a file to a post, probably need to host it externally ...
Update: I found a widget based on syntaxhighlighter that makes things a bit easier.
Rendering a model from the XNA Content Pipeline
When starting a new project you begin with the "fundamentals" (especially if you suffer from the NIH syndrome), you build frameworks, toolkits and all kinds of fun stuff - what I mean is that I have not started working on my game yet :). The most recent of these tools is a Content Pipeline processor that renders a model to a texture. Before you say that this is useless keep reading. One day I was trying to render a terrain heightmap from Blender (there are tutorials here and here) and it hit me, why not render from the pipeline, this would streamline my workflow a little by eliminating the scene rendering step in Blender. All I needed to do was to draw the model using an orthographic projection with a shader that outputs the model height.
So here is the shader:
Pretty simple stuff, just transform and then output the height of the vertex as the color. The projection is orthographic so the Z is already between 0 and 1, no need to scale the value or anything like that.
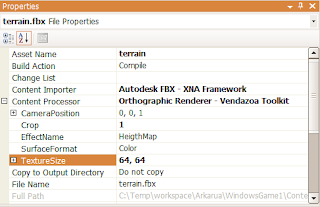
To the content processor now, (I'm not going to go through the moves of creating a content processor project, there is plenty of documentation on the internets), here is the class and the Process method. We create a graphics device and load the shader, then we set up a render target and draw the model using our shader and finally we take the pixel data and return a texture content with it.
The effect loading method employed below is only "slightly" INSANE, if anybody finds a better way of loading an effect in the content pipeline let me know - I tried, I really tried to load a compiled .xnb effect without using a ContentManager but it did not seem possible without recreating a lot of code from the ContentReader. Also, this method does a fair amount of work, it will first look for a .xnb file and if not found it will try to load and compile a .fx file and finally it will try to load the effect from the internal resources.
And here is the IGraphicsDeviceService implementation.
There is nothing special about the drawing method below, just that it took me some time to figure out how to properly get the vertex and index buffer from a ModelContent which is almost, but not quite, entirely unlike the ModelMesh.
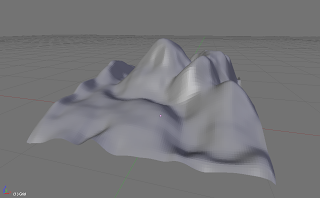
And now the proof. This is the original mesh in Blender, notice the little axis icon on the bottom right corner - the Z is up, make sure the FBX exporter rotates the model to match the XNA coordinate system.
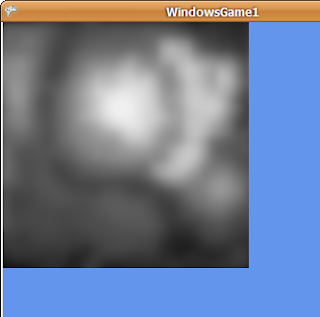
Now the processor options and the generated heightmap:
If you create a terrain using this heightmap and everything goes well you should get something very similar with your original model.
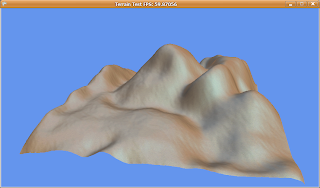
"The resemblance is striking"
Here is a tip, if you experience a stair stepping effect (you'll know when you see it) try to reduce the resolution of the image when creating the heightmap texture (see this explanation).
I think this processor could be used for some other things, like rendering sprites or UI elements, pretty much anything that you would model in 3d and then export as image would be a good use case if the rendering quality is not terribly important.
That's it for now, I hope this was useful. Questions? Suggestions? Go ahead, ask and suggest...
So here is the shader:
float4x4 World;
float4x4 View;
float4x4 Projection;

void Transform (float4 position : POSITION, out
    float4 outPosition : POSITION,
    out float3 outPixelPosition : TEXCOORD0) {
    float4x4 worldViewProjection = mul(mul(World, View), Projection);
    outPosition = mul(position, worldViewProjection);
    outPixelPosition = outPosition.xyz;
}

float4 Heightmap(float3 pixelPosition : TEXCOORD0): COLOR {
    float h = 1 - pixelPosition.z;
    float4 height = float4(h, h, h, 1.0f);
    return height;
}

technique BasicShader {
    pass P0 {
        VertexShader = compile vs_2_0 Transform();
        PixelShader = compile ps_2_0 Heightmap();
    }
}
Pretty simple stuff, just transform and then output the height of the vertex as the color. The projection is orthographic so the Z is already between 0 and 1, no need to scale the value or anything like that.
To the content processor now, (I'm not going to go through the moves of creating a content processor project, there is plenty of documentation on the internets), here is the class and the Process method. We create a graphics device and load the shader, then we set up a render target and draw the model using our shader and finally we take the pixel data and return a texture content with it.
The effect loading method employed below is only "slightly" INSANE, if anybody finds a better way of loading an effect in the content pipeline let me know - I tried, I really tried to load a compiled .xnb effect without using a ContentManager but it did not seem possible without recreating a lot of code from the ContentReader. Also, this method does a fair amount of work, it will first look for a .xnb file and if not found it will try to load and compile a .fx file and finally it will try to load the effect from the internal resources.
And here is the IGraphicsDeviceService implementation.
There is nothing special about the drawing method below, just that it took me some time to figure out how to properly get the vertex and index buffer from a ModelContent which is almost, but not quite, entirely unlike the ModelMesh.
And now the proof. This is the original mesh in Blender, notice the little axis icon on the bottom right corner - the Z is up, make sure the FBX exporter rotates the model to match the XNA coordinate system.

Now the processor options and the generated heightmap:


If you create a terrain using this heightmap and everything goes well you should get something very similar with your original model.

"The resemblance is striking"
Here is a tip, if you experience a stair stepping effect (you'll know when you see it) try to reduce the resolution of the image when creating the heightmap texture (see this explanation).
I think this processor could be used for some other things, like rendering sprites or UI elements, pretty much anything that you would model in 3d and then export as image would be a good use case if the rendering quality is not terribly important.
That's it for now, I hope this was useful. Questions? Suggestions? Go ahead, ask and suggest...
Friday, September 12, 2008
A shiny new blog
Hello and welcome to my shiny new blog.
So why is this blog here? About a month ago I decided to learn C# and soon after that I needed a fun pet project to exercise my newly acquired "skills" because things were getting boring real fast (I'm not a big fan of doing web apps and winforms).
Somehow, don't remember exactly, I stumbled upon creators.xna.com and in no time I was staring in awe at a CornflowerBlue screen. Next, I looked at a few samples, read some blogs, skimmed through the forum posts, and that was it, I just had to make a game, after all XNA should make it easy, right?
One thing that I noticed is that almost everyone posting in any of the XNA forums has a blog to document the progress of their latest and greatest game/engine, so here is mine. And of course I will make the greatest game evar!!!
Anyway, enough small talk, welcome to my shiny new blog.
Subscribe to:
Comments (Atom)